The term “core” is thrown around a lot these days. Most people think of the core as being the abdominals, or midsection. But if we consider the classic definition of the word, which is “the central part of something,” it means your body’s true core is the pelvis. The pelvis is where the upper and lower segments attach, so it’s the central part of your body.
This also means that if your pelvis is out of proper alignment, it can create unwanted compensations up and/or down your body’s chain. Indeed, problems in the pelvis can cause knee or foot pain, and it can cause low back or shoulder pain.
What’s relevant here are three of the articulations within the pelvis: the two sacroiliac (SI) joints, and the pubic symphysis. These joints make it possible for parts of the pelvis to rotate or tilt, due to the attached muscles being shortened (i.e., overactive) or lengthened (i.e., weak/inhibited).
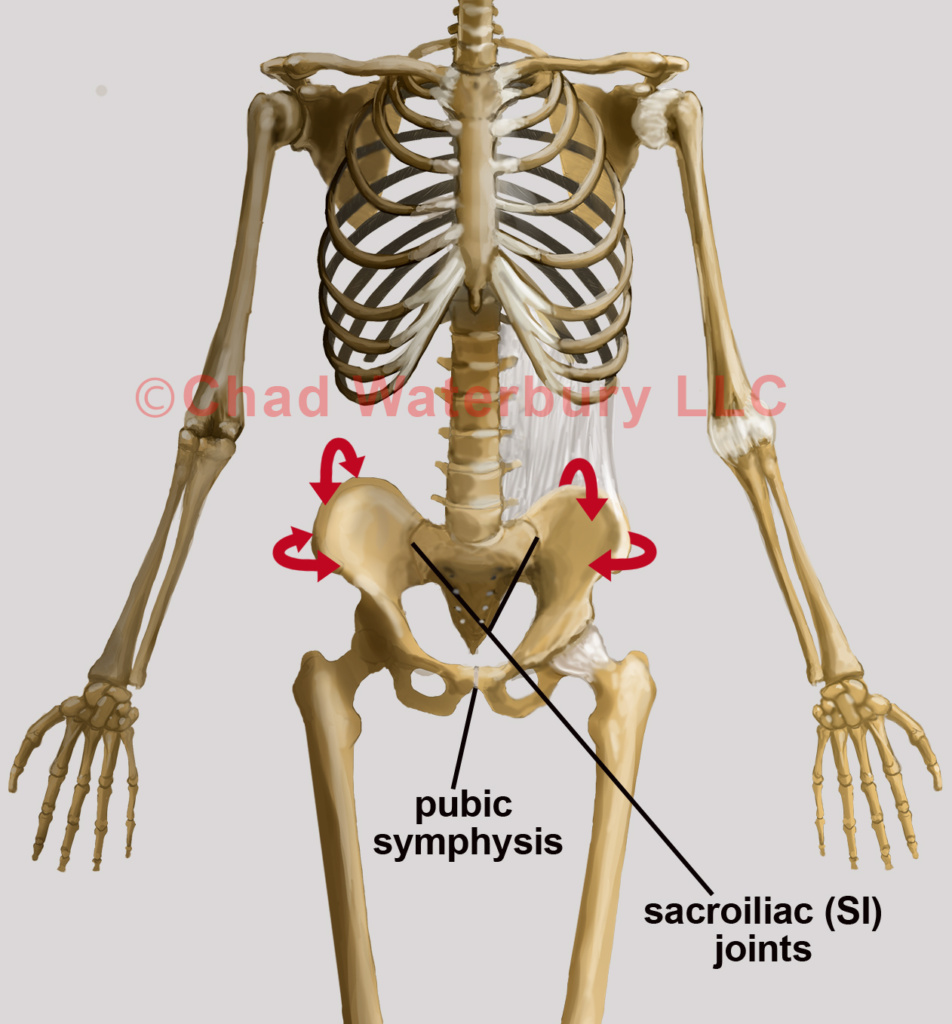
Now, it’s important to mention here that these joints don’t allow for much motion. In fact, some clinicians still question if they can move at all. But anyone that has a hypermobile pelvis or SI joint pain will tell you they can move. And when they move the wrong way, pain and poor performance follow.
The Postural Restoration Institute (PRI) teaches courses that focus heavily on restoring pelvic alignment. I’ve taken their Myokinematic Restoration and Pelvic Restoration courses, and I recommend them to any progressive trainer or clinician.
Nevertheless, becoming proficient at assessing and correcting pelvic alignment can be a complicated task. There are a myriad of muscles, ligaments and tendons in play, and any one of them can be the culprit. Physiotherapist, Diane Lee, is one of the experts that’s giving seminars to help progress this area of practice. I’m talking here about something called “muscle energy techniques,” which simply means you’re activating key muscles to improve function within the body.
Test Yourself
Before we get to the muscle energy technique that I use to restore pelvic function, it’s important to begin by testing yourself (or a client) so you’ll know if the drill worked. I recommend tests similar to the ones I outlined in the Ultimate Glute Development article I wrote last week.
- Stiff hamstrings? Do a standing toe touch assessment, then perform the pelvic alignment correction and immediately retest it.
- Knee or low back pain? Do a movement that causes you to feel the discomfort, then perform the pelvic alignment correction and immediately retest it.
- Need more hip mobility for the squat, lunge or deadlift? First perform the pelvic alignment correction, and then test if your hips/low back feel looser during the exercise.
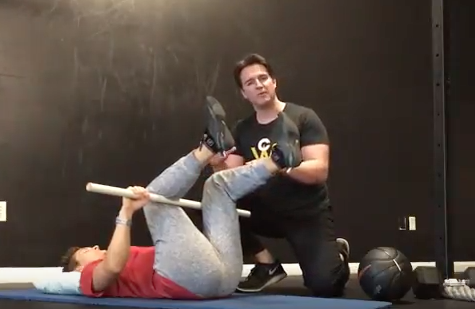
For the following Pelvic Alignment Correction, you’ll need a PVC pipe or strong dowel, as well as a basketball or light medicine ball that’s a similar size.
When should you do this drill? First in your workout. It doesn’t make any sense to warm-up, with even a light jog, if your pelvis is out of alignment. To paraphrase Gray Cook: Don’t put fitness on top of dysfunction.
Give the following drill a try before your next sprint, squat, deadlift or jump session, and your hips and alignment will probably feel much better.
Stay Focused,
CW