Last weekend I gave a two-day seminar at the Staley Performance Institute in Phoenix, AZ. During the seminar I talked extensively about the importance of training with gymnast rings for upper body and core development. The muscle-up represents one of the five essential rings exercises that every power athlete should do. However, it’s often too advanced at first so I explained how to break down the exercise into its components. My instruction starts with the false grip pull-up.
Mastering the false grip pull-up is the first, and most difficult, step toward achieving a powerful muscle-up. Most guys have trouble with a muscle-up because they don’t have the strength to pull a fast pull-up with a false grip, especially from the full hang position.
So let’s do a quick overview of the wrist positions for the rings.
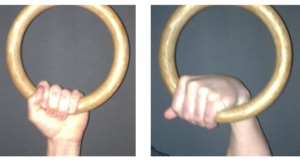
The picture on the left shows the normal wrist position when doing a regular pull-up from rings. This is the strongest and most comfortable position for the wrist. The picture on the right shows the false grip – the grip that makes you instantly feel as weak as a malnourished marathon runner.

The purpose of the false grip is to elevate your wrist so it’s the same height as the bottom of the rings. Without this wrist elevation it’s virtually impossible to rotate your hands and continue into a dip.
When a guy attempts to hang from the rings with a false grip he usually can’t fully straighten his arms, much less pull with any significant strength. It’s definitely an uncomfortable wrist position at first. But like any exercise, you’ll get stronger and your range of motion will quickly increase if you practice it.
Before you attempt a false grip pull-up, it’s essential to have the right rings. The only kind of rings worth buying are made of wood. Plastic, metal or rubber coated rings are too slippery, especially when your hands start sweating. Wood absorbs sweat and is easier to grip. Also, chalk is necessary to keep a rigid wrist position.
My favorite rings for the money are from Christian’s Fitness Factory. It’s the best $82 you’ll ever spend. You can get their wooden rings by clicking this link CFF Wooden Rings.
Now let’s move on to the false grip pull-up. Here’s how you do it.
Starting position: establish a strong false grip and hang with your arms straight, or as straight as you can initially muster, with your legs straight and held in front at a downward angle. This position engages your abs and puts your body at the correct angle to mimic the first part of a muscle-up.

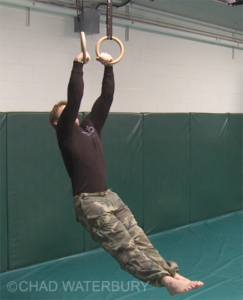
The pull: pull your body as high as possible while keeping your legs in front at a downward angle. The goal is to get to the point where your chin is a few inches above your knuckles, as shown in the picture below. Don’t worry about pulling fast, this is a slower, high tension strength exercise. Plus, it’s easy to lose the false grip if you go too fast at first. Look closely at my wrist position in the pictures so you know you’re doing it correctly.
I’m leaning back as I pull up to the top position because that body angle is necessary to flip your hands, thrust your hips back, and continue into a dip for a muscle-up. Leaning slightly back as you pull up ensures that you’re training the correct initial movement pattern to carryover to a muscle-up.

Lowering phase: the first time you attempt to lower your body into the full hang you’ll probably lose the false grip. The key, again, is to use chalk. Also, lower slowly and concentrate on your wrist position. With a little practice you’ll get the hang of it.
Perform the false grip pull-up for 5 sets of as many reps as possible 2-3 times per week. Once you can perform five full range of motion reps you’ve developed sufficient pulling strength for the first half of a muscle-up.
Stay Focused,
CW
